
Composting is the process of using recycled materials from your home to create an organic soil to add to and replenish the existing soil on your property.
What Can You Use When Composting
• Kitchen waste – Mainly produce trimmings. Think onion skins, celery roots (if you’re not re-growing them), apple cores, banana peels, potato peels.
• Coffee grounds (filters are fine, too)
• Tea bags.
• Grass clippings.
• Dead leaves.
• Straw.
• Sawdust.
• Garden waste.
• Hair
• Cut up paper
• Leaves
• Enormous benefits can be had by adding just a little compost to your soil. Adding compost improves soil structure, aeration and water retention. It also adds important micronutrients and increases the bacterial activity in the soil.
• It’s no wonder that so many gardeners refer to compost as “Black Gold” or “Gardeners’ Gold”. There’s simply nothing better you can do for your soil than to add compost.
Browns ( Carbon )
• leaves
• hay & straw
• paper & cardboard
• woody prunings
• eggshells
• tea bags
• sawdust
Greens ( Nitrogen )
• vegetable peelings
• fruit peelings
• grass clippings
• coffee grounds
• fresh manure
• green plant cuttings
• annual weeds
• young hedge trimmings
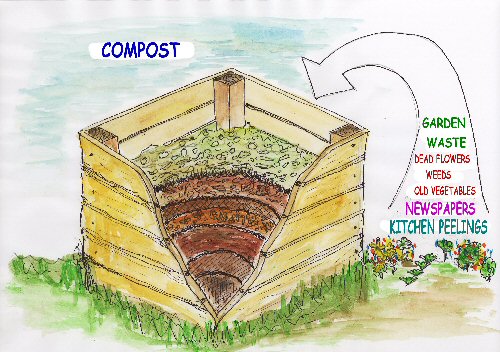
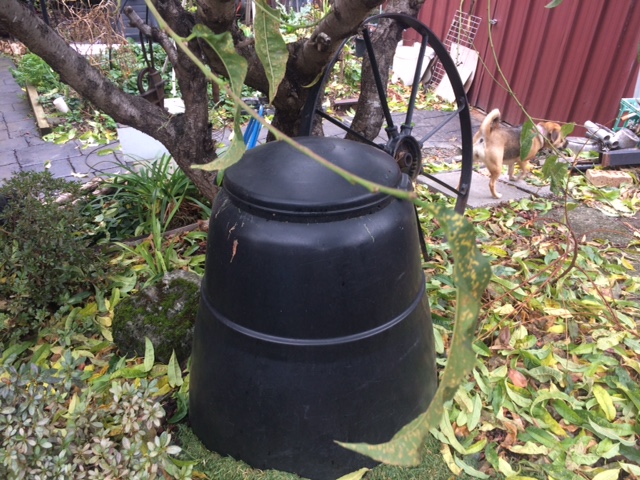
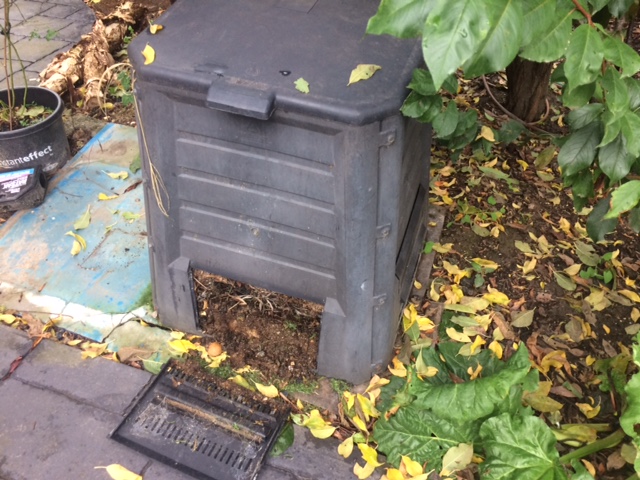
Step 1: Choose Your Compost Bin
Choosing a composting bin is about finding the right bin for your size house and garden. There are many types of bins used to hold the composting materials. There are commercially made square or cone shaped plastic bins, homemade square bins often made of wood, and rotating tumbler style bins just to name a few.
• Each type of bin has its’ own advantages and disadvantages but all types of bins can be used for composting
Step 2: Suitable Location
Choose a site for your composting bin that is level, well drained and that is easily accessible year round. Place the bin over bare soil rather than concrete or paving to ensure that worms and other beneficial organisms can make their way into the pile. It’s a good idea to remove any grass or plants and turn the soil to a depth of about 6 – 8 inches. You may find that you could need to place your bin on a solid concrete base to prevent rodents burrowing under and becoming a pest. Try over soil first.
Step 3: Add Good Composting Materials
Generally, composting ingredients can be divided into two categories: Brown Materials such as leaves, hay, straw and paper and Green materials such as grass clippings, fresh manure, vegetable trimmings and most green plant cuttings. See list above.

Step 4: Don’t Add To Your Compost!
There are a number of materials that you should keep out of your composting pile.
Adding the below materials to your pile is simply dangerous because of the chance of poisoning or disease. Human and pet faeces, chemically or pressure treated wood or sawdust, and meat and animal fats fall into this category and should never be added to your compost pile.
Don’t Add
• meat & bones
• poultry & fish
• fatty food waste
• whole eggs
• dairy products
• human & pet faeces
• pernicious weeds
• treated wood
Adding some items, like vegetable fats and dairy products will simply slow down the composting process by excluding the oxygen that helpful organisms need to do their job. If you add these materials you will still have usable compost, it will just take much longer.
Step 5: Making The Best Compost
Making great compost is good fun and is a bit like making a layer cake!
Start with a 4 ( 400 mls ) inch layer of brush, twigs, hay or straw at the bottom of the bin, this is really for drainage. Then add a 4 inch layer of brown material, then a thin layer of finished compost or good garden soil. That’s one layer.

Then add a 4 inch layer of green material topped with a thin layer of compost or soil. Moisten each layer by misting it lightly with a garden hose. Keep adding materials in alternating layers of greens and browns until the bin is full.
I always find it gets the composting process moving quickly if you give the finished heap a good soaking and then leave it for a week or two. In summer you may also need to water every few days to keep things moist.
Once you have a full bin you can turn the pile every 14 days or so. The more you turn the pile the faster you will have finished compost! It also helps to cover the heap; it will retain moisture and keep pests off.
Step 6: Using Your Compost
Congratulations! Your compost is ready to use!
It can take anywhere from 14 days to 12 months to produce your finished compost. The time it takes can vary widely depending on the materials and methods used. Check out the section below for tips on how to make high quality compost in record time.
The point at which the compost is ready varies based on how the compost will be used. In general though, compost is ready when dark and crumbly and mostly broken down with a pleasant, earthy, soil-like smell to it. For most uses it is acceptable to have some recognizable pieces of leaves or straw remaining.
Compost can be used for:
• House Plants
• Soil amendment and fertilizer
• Flower and Vegetable Beds
• New planting areas
• Established planting areas
• Lawn top dressing
• Compost Tea
• Around trees
Recycling these waste products and making them into prime soil is fantastic for the environment and also very economical. So well done and your house plants, flowers, vegetables and trees will thank you by growing stronger and healthier than ever.
Step 7: How to make Better Compost Quicker.
Here are a couple of hints to make your composting better and perhaps quicker. Start off with layering two to three times more brown ingredients than green ingredients.
Turning – say every two weeks
• You can also artificially aid the aeration of your pile by turning the materials, with a pitchfork or by placing them in some sort of tumbler. In fact turning is an important part of hot composting – as the composting mass heats up and more and more oxygen is consumed, concentrations of this gas within the pile can be depleted regardless of bulking agents etc, so a little help from you can be important.
Water – approx. 50% moisture content
• The micro-organisms in your compost pile need moisture in order to survive, however not too much or they won’t be able to breathe. Ideally your compost pile should have a moisture content of approximately 50%. You can easily check the moisture content by simply taking a handful of the compost and squeezing it in your hand. It should leave your hand moist and not drip more than a few drops when squeezed tightly. Remember that the “green” materials will be adding moisture content, however you may still have to add water. If your compost pile does not have a lid, you may want to cover it during heavy rains if it already has sufficient moisture.

Activators– What is An Activator?- Always worth adding an extra activator as you go!
• Technically, an activator (other than the natural activating GREENs inside your bin) is high in nitrogen. Some activators come in powdered form (bloodmeal, bonemeal, alfalfa meal and other “meals” are good examples).
• Other activators are enzyme-acting so that when mixed in water and sprinkled in your pile the beneficial bacteria are activated.
• Still other activators, and perhaps the cheapest or most readily available, are as simple as manure (chicken, cow, goat, rabbit, etc.), whether fresh or dry. Finally, commercial brand mixes (in 5lb/2.26kg boxes), often called Compost Starters, are available at garden centers and usually have several ingredients from the chart listed plus other high nitrogen sources. Follow the directions on the box.
Call Jim’s Mowing for assistance with your composting work and make fantastic soil from recycled waste!
Recent Comments